Setup Engagement Metrics for Custom API builds
Overview
Galleries Analytics provides both revenue and engagement level insights from an aggregate view down to a specific piece of content or product. When using the Social Commerce API to build your own custom web solutions you will need to include engagement metrics tracking in order to get Galleries Analytics functionality in the Social Commerce App. These steps are only required if you are building your own frontend experience. Metrics are automatically provided by any Social Commerce-provided Galleries solution and these steps are unnecessary.
This guide will walk you through using our javascript library to record the necessary metrics from your custom built solution. In order to see the revenue based reporting, Social Commerce also requires eCommerce Tracking data, specifically checkout (purchase) events. If you use have connected your Google Analytics to Social Commerce in the Social Commerce Application, then see the Google Analytics section below. Otherwise you need to implement the Social Commerce eCommerce Tracking events and that is covered in this guide.
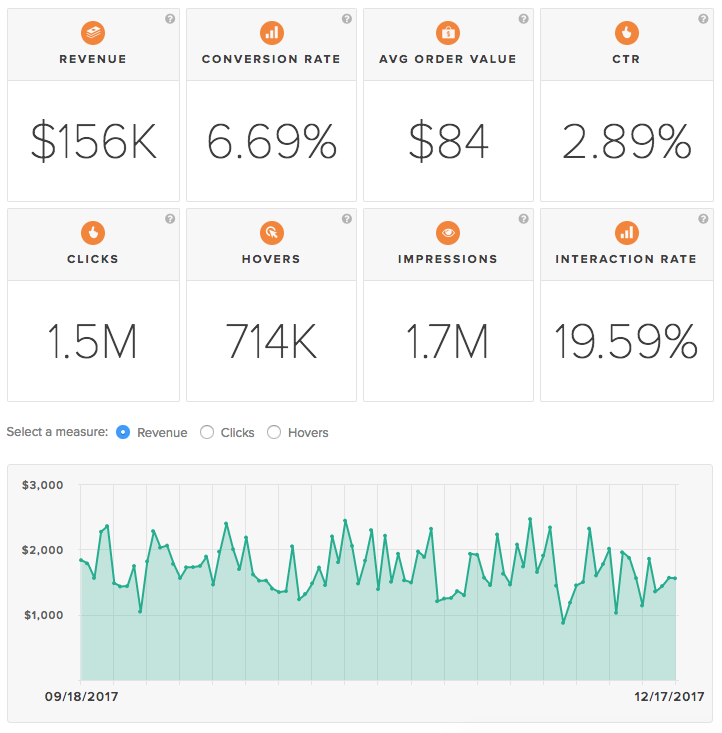
There are 3 types of engagement metrics:
- Impressions
- Clicks
- Hovers
Each of these contribute one or more components on the Analytics page as seen in the screenshot below:
Install Social Commerce script tag
Include the Social Commerce script that contains the metrics tracking functionality.
Copy the snippet below. Replace YOUR_SITENAME with your Social Commerce site name, which can be found in the Social Commerce app by clicking on your brand name in the upper right corner then Integration settings and then Galleries Setup.
|
1 2 3 4 5 |
<script> var CRL8_SITENAME = 'YOUR_SITENAME'; !function(){var e=window.crl8=window.crl8||{},n=!1,i=[];e.ready=function(e){n?e():i.push(e)},e.pixel=e.pixel||function(){e.pixel.q.push(arguments)},e.pixel.q=e.pixel.q||[];var t=window.document,o=t.createElement("script"),c=e.debug||-1!==t.location.search.indexOf("crl8-debug=true")?"js":"min.js";o.async=!0,o.src=t.location.protocol+"//edge.curalate.com/sites/"+CRL8_SITENAME+"/site/latest/site."+c,o.onload=function(){n=!0,i.forEach(function(e){e()})};var r=t.getElementsByTagName("script")[0];r.parentNode.insertBefore(o,r.nextSibling)}(); </script> |
For example, if your site name is Habiliment-RUQGBj then you would use the following script src:
|
1 2 3 4 |
<script> var CRL8_SITENAME = 'Habiliment-RUQGBj'; !function(){var e=window.crl8=window.crl8||{},n=!1,i=[];e.ready=function(e){n?e():i.push(e)},e.pixel=e.pixel||function(){e.pixel.q.push(arguments)},e.pixel.q=e.pixel.q||[];var t=window.document,o=t.createElement("script"),c=e.debug||-1!==t.location.search.indexOf("crl8-debug=true")?"js":"min.js";o.async=!0,o.src=t.location.protocol+"//edge.curalate.com/sites/"+CRL8_SITENAME+"/site/latest/site."+c,o.onload=function(){n=!0,i.forEach(function(e){e()})};var r=t.getElementsByTagName("script")[0];r.parentNode.insertBefore(o,r.nextSibling)}(); </script> |
Initialize Tracker
To begin you must initialize a tracker using init(…) function and the following parameters:
experienceId: can be any unique identifier string that you choose. It must be unique on the page i.e. not used for any other Social Commerce experience on the same page.
baseUrl: Always set to ‘//edge.curalate.com/api/v1/metrics/experience’
displayType: must be one of ‘homepage’, ‘gallery’, ‘pdp’, ‘category’, or ‘campaign’. It should correspond to the type of page that your custom experience lives on.
metricsId: string provided by Social Commerce. which should match the Galleries id in the Social Commerce app.
pixelName: Always set to ‘events.png’.
|
1 2 3 4 5 6 |
var tracker = window.crl8.metrics.init(experienceId, { baseUrl: '//edge.curalate.com/api/v1/metrics/experience', displayType: 'gallery', metricsId: metricsId, pixelName: 'events.png' }); |
The init() function will return a Tracker config object with fpcuid and rid properties. You need to pass these to Social Commerce API calls.
|
1 2 |
var fpcuid = tracker.config.fpcuid; var requestId = tracker.config.rid; |
For example, your Social Commerce API request URL may look something like this:
|
1 |
var url = `https://edge.curalate.com/v1/media/${sourceId}?rid=${requestId}&fpcuid=${fpcuid}`; |
Google Analytics
If you wish to also record metrics to a third-party provider, you may do so with the optional Integrations setup. Currently Google Analytics is supported. This will send events to whichever GA script you have running on your page that also contains the Social Commerce-powered Experience. If no GA script exists on the page, no events will be passed into GA.
|
1 2 3 4 5 6 7 8 9 10 11 |
window.crl8.metrics.init(experienceId, { baseUrl: '//edge.curalate.com/api/v1/metrics/experience', displayType: 'gallery', integrations: { ga: { isEnabled: true, } }, metricsId: metricsId, pixelName: 'events.png' }); |
Adobe Analytics
If you wish to enable revenue metrics using Adobe Analytics, first follow these setup steps. Once completed, please proceed to add the following code your pages hosting your experiences. This will record a requestId into a specified eVar in the reportSuite on the given page. This is the same eVar that you identified as part of the aforementioned linked setup steps.
|
1 2 3 4 5 6 7 8 9 10 11 12 13 |
window.crl8.metrics.init(experienceId, { baseUrl: '//edge.curalate.com/api/v1/metrics/experience', displayType: 'gallery', integrations: { adobeAnalytics: { isEnabled: true, useStandalone: true, // true if using window.s, false if using _satellite (adobe DTM/Launch) eVars: 'eVar63', // this should match the available eVar provided to Social Commerce } }, metricsId: metricsId, pixelName: 'events.png' }); |
Note: window.s or _satellite is required for Adobe Analytics integrations
Record Events
Recording events involves using Javascript to detect interactions and fire corresponding events.
At minimum, the following events should be recorded in order for the Social Commerce dashboard to properly display metrics:
- Page Impression
- Item Click
- Product Click
For full Galleries Analytics functionality these additional events are needed:
- Page Viewable Impression
- Item Impression
- Product Impression
- Item Hover
- Product Hover
Page Impression
This should be fired once per page session after the initial call to the Social Commerce API to fetch content. If the API returns content successfully, record the ‘pageImpression’ event.
|
1 2 3 4 |
window.crl8.metrics.recordEvent({ experienceId: experienceId, eventName: 'pageImpression' }); |
This event must be fired for other engagement events (clicks, views, hovers) to be counted properly.
Item Click
This should be fired whenever a piece of content is clicked.
|
1 2 3 4 5 6 7 8 |
window.crl8.metrics.recordEvent({ experienceId: experienceId, eventName: 'itemClick', eventData: { itemId: itemId, // itemId from the Social Commerce api position: position // 1 based index of item in the Experience's layout. } }); |
Product Click
This should be fired whenever a product link is clicked that will bring the user to a PDP. Products are associated with a piece of content (item) and that item to product relationship is tracked on the event by specifying both the itemId and productId.
|
1 2 3 4 5 6 7 8 9 10 |
window.crl8.metrics.recordEvent({ experienceId: experienceId, eventName: 'productClick', eventData: { itemId: itemId, // related itemId from the Social Commerce api productId: productId || productStyleId, // from the Social Commerce api productStyleId: productStyleId, // from the Social Commerce api position: position // index of item in the Experience's layout } }); |
Understanding Product Ids
The Social Commerce API provides, potentially, two different productIds. Let’s say the following object gets returned by the Social Commerce API:
|
1 2 3 4 5 6 7 8 9 10 11 12 13 14 15 |
"products": [{ "id": "s_855_d7c845cd68b97a288f5c16bd0a723", "name": "Air Jordan 1 Retro High Flyknit", "images": [], "price": { "display": "180.00", "value": 180 }, "metadata": { "brand": "Jordan", "category": "Shoes", "isAvailable": "true", "productId": "919704" } }] |
productStyleId: this corresponds with Social Commerce’s internal product identifier. In the example above, this is the “id”: “s_855_d7c845cd68b97a288f5c16bd0a723”. This value will always be available in the Social Commerce API.
productId: this corresponds with the product identifier from your product feed, if available. It will be found in the metadata object. In the example above, this is the “productId”: “919704”.
When sending productId data to Social Commerce’s metrics, if both productId types are available for that product, then send both as separate parameters. If the productId is not available, then send the productStyleId value in its place.
Other events (advanced)
Metrics tracking supports these additional events:
‘pageViewableImpression’ – Trigger on a regular interval when the experience is viewable on the page e.g., for at least 1 second.
|
1 2 3 4 5 6 7 |
window.crl8.metrics.recordEvent({ experienceId: experienceId, eventName: 'pageViewableImpression', eventData: { elapsedTime: elapsedTime // time in milliseconds since the last pageViewableImpression } }); |
‘itemImpression’ – Trigger when an item is viewable e.g., for at least 1 second.
|
1 2 3 4 5 6 7 8 9 |
window.crl8.metrics.recordEvent({ experienceId: experienceId, eventName: 'itemImpression', eventData: { itemId: itemId, // itemId from the Social Commerce api position: position, // 1 based index of item in the Experience's layout. elapsedTime: elapsedTime // time in milliseconds since the items last itemImpression } }); |
‘itemHover’ – Trigger when a user hovers over an item.
|
1 2 3 4 5 6 7 8 9 |
window.crl8.metrics.recordEvent({ experienceId: experienceId, eventName: 'itemHover', eventData: { itemId: itemId, // itemId from the Social Commerce api position: position // 1 based index of item in the Experience's layout. elapsedTime: elapsedTime // Hover time in milliseconds } }); |
‘productImpression’ – Trigger when a product becomes viewable e.g., for at least 1 second.
|
1 2 3 4 5 6 7 8 9 10 11 |
window.crl8.metrics.recordEvent({ experienceId: experienceId, eventName: 'productImpression', eventData: { itemId: itemId, // related itemId from the Social Commerce api productId: productId || productStyleId, // from the Social Commerce api productStyleId: productStyleId, // from the Social Commerce api position: position, // index of item in the Experience's layout elapsedTime: elapsedTime // time in milliseconds since the product's last productImpression } }); |
‘productHover’ – Trigger when an end user hovers over a product.
|
1 2 3 4 5 6 7 8 9 10 11 |
window.crl8.metrics.recordEvent({ experienceId: experienceId, eventName: 'productHover', eventData: { itemId: itemId, // related itemId from the Social Commerce api productId: productId || productStyleId, // from the Social Commerce api productStyleId: productStyleId, // from the Social Commerce api position: position // index of item in the Experience's layout elapsedTime: elapsedTime // Hover time in milliseconds } }); |
Code Sample
|
1 2 3 4 5 6 7 8 9 10 11 12 13 14 15 16 17 18 19 20 21 22 23 24 25 26 27 28 |
<head> <script src="https://cdn.curalate.com/sites/Habiliment-RUQGBj/site/latest/site.js"></script> </head> <body> <script> // Init tracker var experienceId = 'demo-experience'; var tracker = window.crl8.metrics.init(experienceId, { baseUrl: '//edge.curalate.com/api/v1/metrics/experience', displayType: 'gallery', metricsId: 'habiliment', pixelName: 'events.png' }); // Pass fpcuid=[fpcuid]&rid=[rid] these when making calls to the Social Commerce API var fpcuid = tracker.config.fpcuid; var rid = tracker.config.rid; // Record page impression window.crl8.metrics.recordEvent({ experienceId: experienceId, eventName: 'pageImpression' }); </script> </body> |
Debugging
- Set debug: true in the metrics.init call for more verbose console output and stricter validation.
- Check the console for any errors. The javascript library validates for missing parameters before firing the pixel request.
- If you’re not seeing any console errors, but you encounter 400 HTTP responses for any requests, you can change the pixel name from events.png to events.json to get an error message.
- When looking at the network trace or error messages you will see parameter abbreviations for each of the event types recorded and their data values.
Event Types
pageImpression: ‘pi’
pageImpressionNoContent: ‘pinc’
pageViewableImpression: ‘pvi’
itemImpression: ‘ivi’
itemHover: ‘ih’
itemClick: ‘ic’
productImpression: ‘prvi’
productHover: ‘prh’
productClick: ‘prc’
Event Data Parameters (inputs vary based on event types)
itemId: ‘iid’
productId: ‘pid’
productStyleId: ‘psid’
position: ‘pos’
displayType: ‘dt’
elapsedTime: ‘et’
Other Request Parameters (these are handled automatically by the library)
experienceId: ‘xp’
requestId: ‘rid’
firstPartyCuralateUserId: ‘fpcuid’
referrer: ‘ref’
Sandbox MetricsId
If you’re utilizing a sandbox environment with automated testing and want to avoid pushing test metrics from into your production data, you can use ‘testanalytics’ as the value for the metricsId when initializing the tracker:
|
1 |
metricsId: 'testanalytics' |